

BioCatch Integration
Alloy's SDK supports BioCatch Account Opening solution.
Setup
- You will have received an email from BioCatch which contains several pieces of information, including:
customerId- this is the unique identifier for the BioCatch service. This is easily identifiable, as BioCatch uses the names of movie characters. We will need this value later when configuring Alloy from the administrative interface.jsUrl- This is where thealloy-web-sdkwill load the BioCatch javascript from. It is also provided in the onboarding document. It will look something like this:- You will additionally need to ask BioCatch to provide a
brandsetting. A brand is string value, and is a way of segmenting data under onecustomerId. See also:- A
brandmust be requested from your BioCatch representative. - <https://docs.biocatch.com/docs/brand-usage-in-biocatch-applications
- https://docs.biocatch.com/v1/docs/scoring-api-request-parameters#brand
- A
There is no test environment for BioCatch, only a production environment
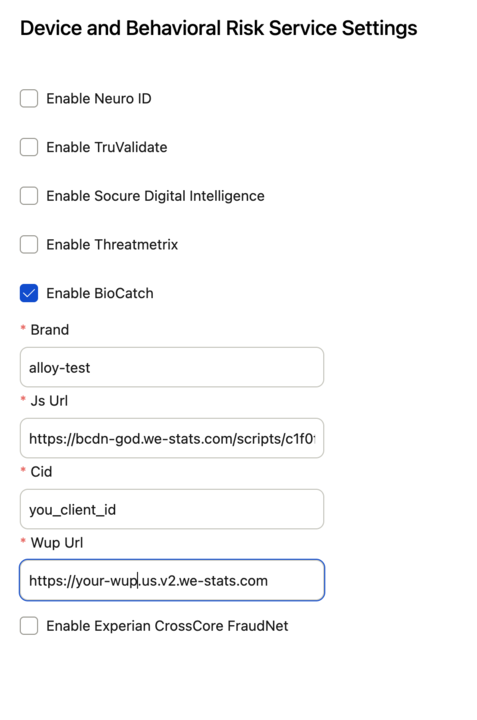
- Once you have the
brandandjsUrlvariables, they can be set in are set underSettings⇒SDK⇒[Journey Name]⇒Device and Behavioral Risk Service Settings:

Starting with version 2.3.8 of the SDK you can use BioCatch's hybrid mode, for this you have to init the Alloy-SDK with runtimePlatform="hybrid" and configure the "Cid" and "Wup Url".
- To integrate with the Journey (the creation of which is not covered here), you will also need:
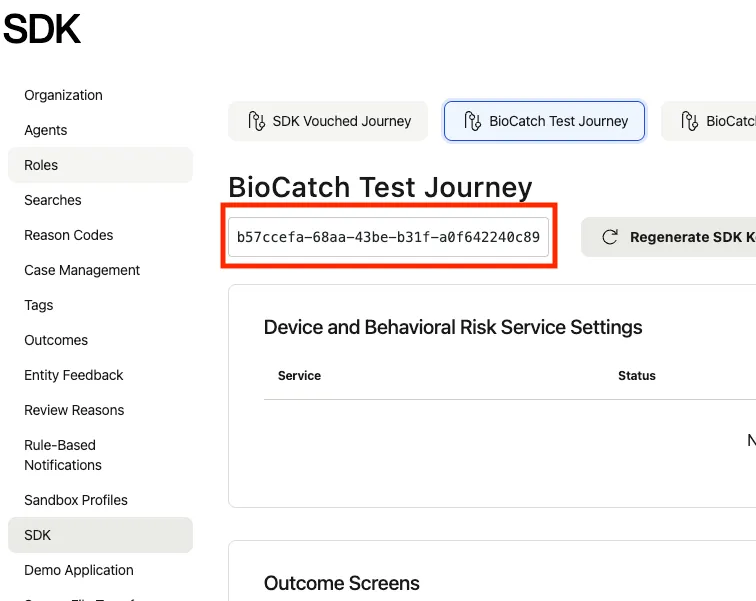
journeyToken- this is can be obtained from theJourney Tokenfield in the Client area underJourneys⇒[Journey Name]key- this is the SDK key from the Client area underSettings⇒SDK⇒[Journey Name]
Form Integration
BioCatch has an extensive procedure to integrate with a form, so a good place to start is the BioCatch JS SDK documentation.
When setting a form up for alloy, you will need to do the following
- import the
alloy-web-sdkand prepare the call toinitthat will initialize the BioCatch SDK and start the flow of data - set up the
createJourneyApplicationcall - integrate the form into the flow
Init
The alloy-web-sdk can be installed via the command line:
npm install @alloyidentity/web-sdkIn javascript, for example, you can import the library:
import alloy from '@alloyidentity/web-sdk';In typescript, you can also import the Init type:
import alloy, { Init } from '@alloyidentity/web-sdk'; The alloy.init() call can look something like this, using the minimum required values that are described earlier:
const alloyInitParams: Init = {
  key: 'MY_SDK_KEY', // sdk key
  journeyToken: 'MY_JOURNEY_TOKEN', // BioCatch Production Journey
  bcContext: 'MY_BIOCATCH_INITIAL_CONTEXT',
  bcCustomerSessionId: 'MY_CUSTOMER_SESSION_ID'; // optional--you can generate one yourself or one will be created for you
  production: true // this is false by default
};

let alloyInitResult;

try {
  alloyInitResult = await alloy.init(alloyInitParams);
  console.log('***** alloy init returns', alloyInitResult);
} catch (ex) {
  console.error(ex);
}
CreateJourneyApplication
Once you have filled out your form, you will submit it as a “Journey Application” using the values you received during initialization, plus some that come from the form.
This is one example of how to set up the createJourneyApplication call—your TAM can guide you through the process:
// optional data
export interface JourneyGenericData {
  name_first: string;
  name_last: string;
  address_line_1: string;
  address_city: string;
  address_state: string;
  address_postal_code: string;
  address_country_code: string;
}

// biocatch required and optional data
export interface BioCatchGetScoreRequest {
  customer_session_id: string;
  user_agent: string;
  application_id?: string; // application_id is optional
  brand: string;
  year_of_birth: string;
  activity_type: string; // 'OPEN_NEW_ACCOUNT'
}

const sendToAlloy = async (bioCatchData) => {
    const journeyPayload = {
      do_await_additional_entities: false,
      entities: [
        {
          branch_name: 'persons',
          entity_type: 'person',
          data: bioCatchData
        }
      ]
    };

    const journeyApplication = await alloy.createJourneyApplication(journeyPayload);
    return journeyApplication;
  };
When the user clicks on the form, it should trigger the sendToAlloy() call:
// required
const biocatchScorePayload = {
  customer_session_id: alloyInitResult?.bcCustomerSessionId || 'ERROR',
  application_id: MY_APPLICATION_ID,
  brand: alloyInitResult?.bcBrand || 'unknown',
  year_of_birth: '1999',
  activity_type: 'OPEN_NEW_ACCOUNT',
  user_agent: navigator?.userAgent || 'Alloy SDK'
};

// optional alloy journey values
const payload = {
  name_first: data.page1.firstname,
  name_last: data.page1.lastname,
  address_line_1: data.page1.currentAddress,
  address_city: data.page1.city,
  address_state: data.page1.region,
  address_postal_code: data.page1.postalCode,
  address_country_code: 'US',
  ...biocatchScorePayload
};

try {
  const result = await sendToAlloy(payload);
  console.log("journey application result", result);
} catch (ex) {
  console.error(ex);
}
Form Elements
On the form itself, you can provide a custom attribute data-bb , as described in the BioCatch documentation: https://docs.biocatch.com/docs/screens-and-elements. It will use the id if a data-bb attribute is not provided.
<input type="text" id="username" data-bb="username">This can be discussed with the BioCatch representative.
Successful Integration
The “js-testing” section of the BioCatch documentation tep through how to verify a successful integration.
A WUP-server accepts data packets in the background from the user. You should be able to see these calls in the Network tab of the Chrome debugger when it is set up correctly.
Having more than one BioCatch integration active on one web site is not supported, even if they are not active simultaneously. This includes non-alloy BioCatch integrations. This is because there is a singletonwindow.cdApivalue that BioCatch sets, and setting up BioCatch twice may cause really bad unintended consequences, such as a mixing-up of data two different user interactions.
Advanced Setup
BioCatch SDK
On initialization, the BioCatch SDK returns a value to the global variable cdApi. the alloy.init() call will return this in the payload as bcCdApi.
You can use this to set the context, or use other BioCatch-specific custom functionality. For example:
alloyInitResult.bcCdApi.changeContext('unique_string_per_page');You can read more about these here:
A full list of parameters is here:
Contexts
BioCatch has the concept of contexts, and strongly recommends that a form be set up to use them. From the documentation:
Every screen must have a unique context name so that BioCatch can precisely identify it.
For optimal coverage and performance, set up your own subdomains that point to BioCatch servers, instead of using the default endpoints.
These contexts are used in real time for data processing and risk scoring, and in other applications including Analyst Station and Rule Manager.
Set one context for each page or, in a single-page application, one context for each view.
The purpose of a context is to identify each page/screen. Use dashes ('-') or underscores ('_') in the context name; do not use spaces.
source: https://docs.biocatch.com/v1/docs/client-setup-requirements-ao
source: https://docs.biocatch.com/docs/js-mandatory-functions
source: https://docs.biocatch.com/docs/context-elements
You can access this from the bcCdApi object that is returned during init().
Customer Session Id
BioCatch has several rules for valid characters for session id fields. For example:
Each CSID value must:
- Contain between 10 and 100 characters
- Contain only the following characters: A-Za-z0-9,!@$%^&*.=+-_/~
- Be unique for every session, as defined below
source: https://docs.biocatch.com/v1/docs/en/session-management
This helper function will generate a random one:
export const generateUniqueBioCatchSessionId = () => {
  const length = Math.floor(Math.random() * 100) + 10;
  // noinspection SpellCheckingInspection
  const chars = 'ABCDEFGHIJKLMNOPQRSTUVWXYZabcdefghijklmnopqrstuvwxyz0123456789!@$%^&*.=+-_/~';
  let result = '';
  for (let i = length; i > 0; i -= 1) result += chars[Math.floor(Math.random() * chars.length)];
  return result;
}
If you don’t create a customer session id, one will be created for you.
Application Id
If you wish to save a session, you can use the applicationId. You should refer to the biocatch documentation for this:
Updated 9 months ago