

Integration
Journeys are designed to provide a synchronous response to allow you to provide feedback, next steps, or a final decision to your users.
They are accompanied by Webhooks for processing asynchronous actions that require the user to leave and later return to the process, such as Manual Reviews, and for reliable and resilient processing of events into your system of record. For examples and definitions of each journey event, please see Journeys Events.
Create a Journey Application via API
It’s now time to create your Application by making a POST request to this endpoint:
Authentication
Authorization is handled by using a workflow_token:workflow_secret pair as HTTP Basic Auth, similar to creating an evaluation. Any valid pair of workflow_token and workflow_secret found in your account will work for authorizing your Journey. Please see the Authentication Guide for more information.
Workflow Token and Secret
The workflow_token and workflow_secret by navigating to the Workflows section in your Alloy dashboard. Select the relevant workflow, and the keys should be displayed on the left side of the screen.
Journey Token
The journey_token can be found on the Journeys section in the Alloy dashboard. See below.
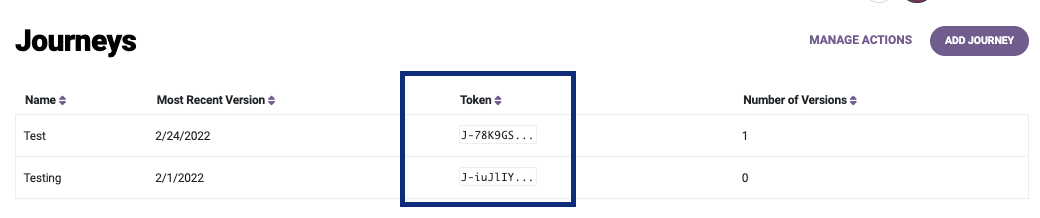
The token can be copied by hovering over it and clicking on the clipboard icon.
Retrieve a Journey Application via API
Handling the synchronous response to manage your front-end applicant experience
Inspecting your response
Your synchronous response will contain many fields (refer to the API Reference for details on each field). However, there are only a few fields you need to parse to build your application flow. These are future-proofed against future changes when handled properly. These fields are:
- status (top-level key): This is the current status of the Application as a whole.
- If it is
completed, this means that the Application has finished processing and thecomplete_outcomefield should now be populated. - Please refer to the Application Statuses to understand how the
entity_application_statusfields for each Entity are used to determine this Group Applicationstatus. - Note: There is also a
journey_application_status, which is a human-readable text rendered in your Alloy dashboard. This is separate fromstatus.
- If it is
- complete_outcome (top-level key): This is the final decision of your Application as a whole; it will be
nulluntil a final decision is assigned to your Application.- This field can be
ApprovedorDenied.
- This field can be
- _embedded.entity_applications: This object will contain any outcome reasons, output attributes, or Matrix Model outputs aggregated from the outputs of every evaluation run for the entity application.
To learn more about possible statuses, please see the Application Statuses tab.
Manage the Webhook Response
Handling the asynchronous response to dictate your backend business logic
Journeys have robust Webhooks for every event that happens within them. Some actions in a Journey Application may occur asynchronously - for instance, your Application may require manual review or document upload. As such, you should set up Webhooks for processing the intermediate and final states of a Journey Application into your system of record.
You’ll want to make sure to configure webhooks in the dashboard to send out all Journey-related events to your endpoints since the Journey's webhook handles the applicant's state management.
For a complete list of Journey webhook events, please see Webhooks — Journey Events.
Configuring a Journey Webhook
- Navigate to Webhooks in Settings, and click on
+ Webhook - Under "Select a trigger action", select
Notify on Sandbox Journey status Application changeorNotify on Production status Application change, depending on which environment you want to run your Journey in. - Fill in the name, endpoint URL, and authentication settings.
- Test the webhook by clicking the
Test Webhookbutton in the bottom left corner. - When finished, click "Create" to exit and save your changes.
Please refer to the Application Statusessection to better understand each webhook event, and its associated Entity Application status. This will help you to understand your Group Application Status.
Update Your Journey Application
How to advance your Application depending on Entity Application status
If your Journey contains a service that requires additional information from the user when hit, or if you have a Step Up Node or Action Node in your Journey, your Application will stop mid-way through and will wait for you to add the additional information.
Here are the different cases in which you’d need to update your Application to advance it through the Journey:
Data Requests
Expand for more detail
data_request_evaluationdata_requestA data request will be thrown in the case that either your Journey Application lands on a workflow that contains at least one data vendor which requires extra information from the user (such as KBA), or due to missing data or formatting errors. If a data request is made, it will include the accompanying webhook event of data_request_evaluation. See Application Statuses for more information.
The webhook payload for this event will include several pieces of information to handle the event, including the data._embedded.node.workflow_token which identifies which workflow the data request is from. Please see Journeys Example Payloads.
Additionally, data._links.evaluation will refer to the full response from the data request. If you make a GET request to that URL, it will display the precise information needed to advance the Application. You may want to use the fullData=true in your query parameters. If this value is true, the full evaluation response is included in each event of type completed_evaluation in the array within the response under _embedded.events[].
Finally, you can advance the Application by using this PUT endpoint, placing the required missing data in the body of your request.
Document Verification Nodes
Expand for more detail
> ❗️ Performing step up verification?
Document Verification Nodes are being deprecated for all new integrations. Please see "Step Up Nodes" section
pending_documentspending_documentsIf a Journey arrives at a Document Verification Node, the Application pauses so that the documents may be uploaded and verified before advancing.
- From this, you would receive a webhook event,
pending_documents(example). - The dashboard at this point would show “Pending” status. You can verify this by making a GET to the this endpoint and observe the relevant fields outlined in the Application Statuses section.
To advance your Journey Application, you will need to first upload the documents.
- You will want to collect the document tokens which will be returned for each document.
- You can then advance the Journey Application by making a PUT request to this endpoint, with the document tokens in the body of the request. Verify that the Application has properly advanced by making another GET request.
To upload documents via Alloy’s SDK:
You can refer to our Document SDK’s section here in our Guide. The SDK utilizes the step up node type.
The SDK handles all of the backend API calls for you - no further action is needed after user presses “submit.”
If you are using a vendor or third-party SDK:
Documents do not need to be uploaded via API, but a PUT request still needs to be made. Please contact the Alloy Implementations team for more information
If you upload documents via our endpoints:
- If the Entity in question does not yet exist in Alloy, use this POST and then this PUT endpoint. This use case is only applicable with Journeys if documents have been uploaded prior to the Journey Application beginning.
- If the Entity in question already exists in Alloy, use this POST and then this PUT .
Step Up Nodes
Expand for more detail
pending_step_uppending_step_upIf a Journey arrives at a Step Up Node, the Journey Application pauses so that the required step up action may be completed and verified before advancing. From this, you would receive a webhook event, pending_step_up (example).
- The dashboard at this point would show “Pending” status. You can verify this by making a GET to the this endpoint and observe the relevant fields outlined in the Journey Application Statuses section.
To advance your Journey Application, you will need to take action based on the type of step up.
- For example, if you're doing document verification, you will want to collect the document tokens which will be returned for each document.
- You can then advance the Journey Application by making a PUT request to this endpoint, with the document tokens in the body of the request. Verify that the Journey Application has properly advanced by making another GET request.
Perform Step Up via Alloy’s SDK:
You can refer to our Document SDK’s section here in our Guide. The SDK utilizes the step up node type.
The SDK handles all of the backend API calls for you - no further action is needed after user presses “submit.”
If you are using a vendor or third-party SDK:
A PUT request needs to be made. Please contact the Alloy Implementations team for more information
If you upload documents via our endpoints:
- If the Entity in question does not yet exist in Alloy, use this POST and then this PUT endpoint. This use case is only applicable with Journeys if documents have been uploaded prior to the Journey Application beginning.
- If the Entity in question already exists in Alloy, use this POST and then this PUT .
Expiring Step Up Nodes
- When you create or edit a Step Up Node, you can configure it to expire after a certain number of days, hours, and/or minutes.
- If a Step Up expires, the Journey Application advances to the node to which the expired outcome for that action is mapped. If a user opens the SDK after the node has expired, they will see a message indicating that they need to return to their application to get more information.
- The expiration timer for a Start Up starts when a Journey Application arrives at that node.
User Action Nodes
Expand for more detail
pending_actionpending_actionThere are two types of action nodes you could hit in a Journey - an “external service” node, which waits for a response from a service which is called outside of Alloy, or an “end user action” node, which requires an action on the part of the applicant, like accepting an offer for a new product, or un-freezing their credit.
If your Journey Application comes across this node, you should expect to see the webhook event, pending_action (example). For more information, please see the Journey Application Statuses section.
Once the external event has finished and you have determined the outcome based on the result of this event, submit the outcome by making a PUT request to this endpoint. (Note: this is a different endpoint from the PUT for DocV and data requests).
Please note: For a joint or business Journey Application, it is required to identify the entity by entity_token or entity_application_token.
The node_id can either be obtained from the webhook event for pending_action under data._embedded.node.id , or from the GET /applications response on the pending_action event, and then within the event, it’s _embedded.node.id.
Node IDs are not guaranteed to remain as the same value and can change across different versions of the same Journey in some scenarios.
You can verify that the Journey Application has properly advanced based on the outcome submitted by making another GET request or viewing the Application in the UI.
Expiring Action Nodes
- When you create or edit an action, you can configure it to expire after a certain number of days.
- If an action expires, the Journey Application advances to the node to which the expired outcome for that action is mapped.
- The expiration timer for an action starts when a Journey Application arrives at that node.
- It is important to note that a Journey Application with an expiring action node does not advance to the next node immediately when the timer hits the expiration time. Rather, it can advance at the following moments:
- When the system checks that the Journey Application’s current node has expired.
- Every 12 hours from the time a Journey Application advances to an action node that expires, the system checks if the node has expired since it has last checked. If it the action node has since expired, then the Application advances.
- When a
PUTrequest is made tojourneys/:journey_token/applications/:application_token/nodes/:node_idand the action node has expired.
Updated 27 days ago